How to change tax rates in QuickBooks Online (UK VAT)
By The AI Ledger editorial team | Published 2026-08-12 | Updated 2026-11-20
To change a VAT rate in QuickBooks Online (UK), go to All apps > VAT > Overview, pick the agency from the drop-down next to VAT, choose Edit [agency name] > Edit rates, select Edit on the rate, change the name, rate or effective date, and save. You can only edit custom rates: QuickBooks' default VAT rates cannot be edited. If the rate you need to change is a default, create a new rate and switch the old one off.
Before you touch anything, run through this short checklist:
- Note your current rates (a screenshot of the Edit rates table is enough).
- Check whether any recurring transactions use the rate you are changing.
- Export your VAT report for the open VAT period.
Tip: _After saving a change, create a test invoice and check the new rate before sending anything to a client or filing a VAT return._
Intuit's help article on editing VAT rates is clear that a change applies to new transactions only. Past transactions are not updated automatically, and reports covering a period that straddles the change may show both rates. Check the figures with your accountant, or against HMRC's VAT guidance, before submitting.
- * *
Key takeaways
Changing a VAT rate in QuickBooks Online safely means editing or replacing the rate, updating every recurring transaction, and exporting reports before and after the change so your VAT records stay clear.
| Point | Details |
|---|---|
| Edit or replace the rate | Edit custom rates from Edit rates; default rates cannot be edited, so create a new rate instead. |
| Update recurring transactions | They do not pick up a replacement rate by themselves. Edit each one before switching the old rate off. |
| Export reports first | Save the VAT report for the open period before making any change. |
| Rates cannot be deleted | QuickBooks Online lets you switch a rate off, not delete it. |
| Get advice on filed periods | If the change touches a VAT return already submitted, speak to your accountant or HMRC. |
- * *
Table of Contents
- What do you need before you start?
- Where to find VAT settings in QuickBooks Online
- How to edit an existing VAT rate in QuickBooks Online
- How to add a new VAT rate
- How to switch off a VAT rate
- How to handle recurring transactions and troubleshoot common errors
- How rate changes affect past transactions, reports and your VAT returns
- UK VAT and HMRC: when to get professional help
- A practical editor's view on safe, repeatable tax-rate workflows
- Sources
What do you need before you start?
| Requirement | What to check |
|---|---|
| Web access | VAT rates can only be added or edited in QuickBooks Online on the web. The iPad app cannot edit them. |
| Admin access | If you cannot see the edit options, ask your account's primary admin to make the change or adjust your permissions. |
| Custom or default rate | Only custom rates can be edited. A default rate needs replacing with a new rate. |
| Recurring transactions | List every recurring transaction that uses the rate you plan to change. |
| A record of the old position | Export the VAT report for the current period and save it outside QuickBooks. |
- * *
Where to find VAT settings in QuickBooks Online
From the left-hand navigation, select All apps, then VAT, then Overview. Next to VAT, open the drop-down and choose the tax agency (usually HMRC). From there, Edit [agency name] gives you Edit rates, which is the table where every rate lives.
Menu labels vary a little between accounts and Intuit articles (some say Tax rather than VAT), so if your screens look different, follow the nearest equivalent. If VAT does not appear at all, VAT may not be set up yet: Intuit's Set up and manage VAT article covers turning it on.
- * *
How to edit an existing VAT rate in QuickBooks Online
Intuit's steps for the web version:
- Go to All apps > VAT > Overview.
- Next to VAT, open the drop-down and select the agency.
- Select Edit [agency name], then Edit rates.
- Find the rate and select Edit in the Action column.
- Change the name, the rate, the effective date, or a mix of these.
- Select Save.
The updated rate applies to new transactions from then on. Transactions already saved keep their original rate unless you edit them by hand, and backdated transactions you enter after the change use the new rate.
If the Edit option is missing, the rate is a QuickBooks default. Create a new rate at the correct percentage, move any recurring transactions onto it, and then switch the old rate off.
- * *
How to add a new VAT rate
Sometimes a new rate is cleaner than editing an old one, especially when a change takes effect part way through a VAT period and you want earlier transactions to stay as they are.
- Go to All apps > VAT > Overview.
- Select Add tax, then Tax rate.
- Enter the rate name, the agency and the percentage.
- Select Save.
Give the rate a name that says what it is, for example the rate type and percentage. If you use standard-rated and reduced-rated supplies in the same account, clear names make it much harder to pick the wrong one.
- * *
How to switch off a VAT rate
QuickBooks Online does not let you delete a VAT rate, but you can switch it off:
- Go to All apps > VAT > Overview and select the agency.
- Choose Edit [agency name] > Edit rates.
- Switch the rate from On to Off.
To see rates you have switched off, select the gear icon above the Action column and tick Include inactive. Intuit's article is not consistent on whether an inactive rate can be switched back on, so do not count on it: check in your own account before relying on that.
Switching a rate off removes it from new transactions while past invoices keep it, which is why it is often safer than editing. Before you do it, check no recurring transaction still uses the rate.
- * *
How to handle recurring transactions and troubleshoot common errors
Intuit's advice for recurring transactions, particularly ones that charge automatically, is to create the new rate, update the recurring transactions to use it, and only then switch the old rate off.
- Create the new rate (or confirm the edited rate is saved).
- Go to Settings > Recurring transactions.
- Open each one that used the old rate and change the VAT field to the new rate.
- Save it.
- Switch the old rate off only after every recurring transaction is updated.
- Create a test invoice or sales receipt and check the rate before sending it.
Common problems and fixes:
- No Edit option on the rate: It is a default rate. Create a new rate and switch the old one off.
- Cannot reach VAT settings: Your user may not have the access needed. Ask the primary admin.
- Wrong rate on new invoices: A recurring transaction was not updated. Go back to Recurring transactions and check each one.
- Rate missing from the drop-down: It may have been switched off. Tick Include inactive in the Edit rates table to find it.
- Trying to change rates on a phone or iPad: Use the web version.
- * *
How rate changes affect past transactions, reports and your VAT returns
A rate change applies to new transactions only. Past transactions keep the rate they were saved with, and reports for an overlapping period may show both rates.
That split can look confusing in a VAT period that straddles the change. The practical steps:
- Export the VAT report for the current period before making the change. Save it as a PDF or spreadsheet.
- Note the date you saved the new rate.
- After the change, run the same report again and compare the two.
- Keep both exports with a short note of what changed and why.
If the change affects a VAT period you have already submitted, do not assume the numbers are fine. Ask your accountant whether a correction is needed. Intuit's VAT adjustments article covers how adjustments are recorded in QuickBooks.
- * *
UK VAT and HMRC: when to get professional help
Most rate changes in QuickBooks are routine bookkeeping. A few situations need more than a settings change.
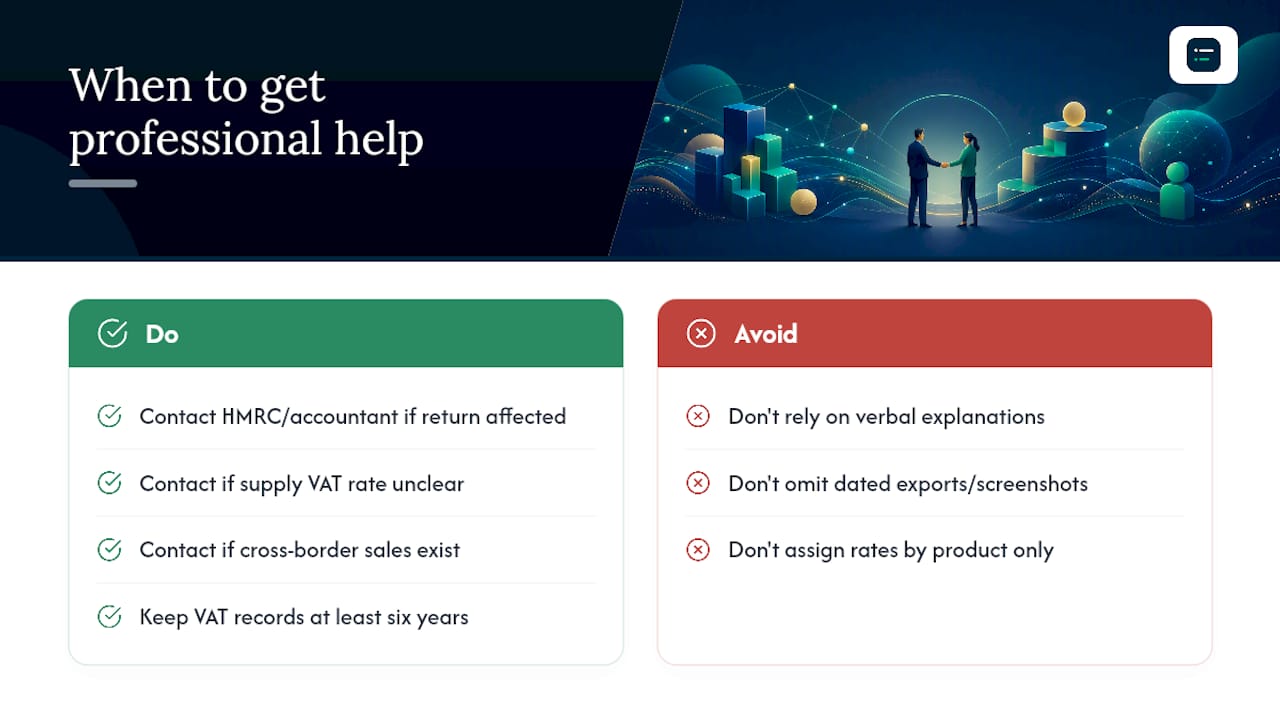
Speak to a qualified accountant or HMRC if: the change affects a VAT return already submitted; you are unsure whether a supply is standard-rated, reduced-rated or zero-rated; you have cross-border sales where UK VAT rules meet overseas obligations; or you are changing VAT accounting scheme at the same time.
HMRC requires VAT records to be kept for at least six years. Exported QuickBooks reports, screenshots of the old and new rate settings, and a note of the change date and reason all help if HMRC ever asks about a return.
If your account handles both UK and overseas sales, check that the right rate is assigned to each customer's location, not just each product.
- * *
!UK VAT and HMRC: when to get professional help, overview diagram
A practical editor's view on safe, repeatable tax-rate workflows
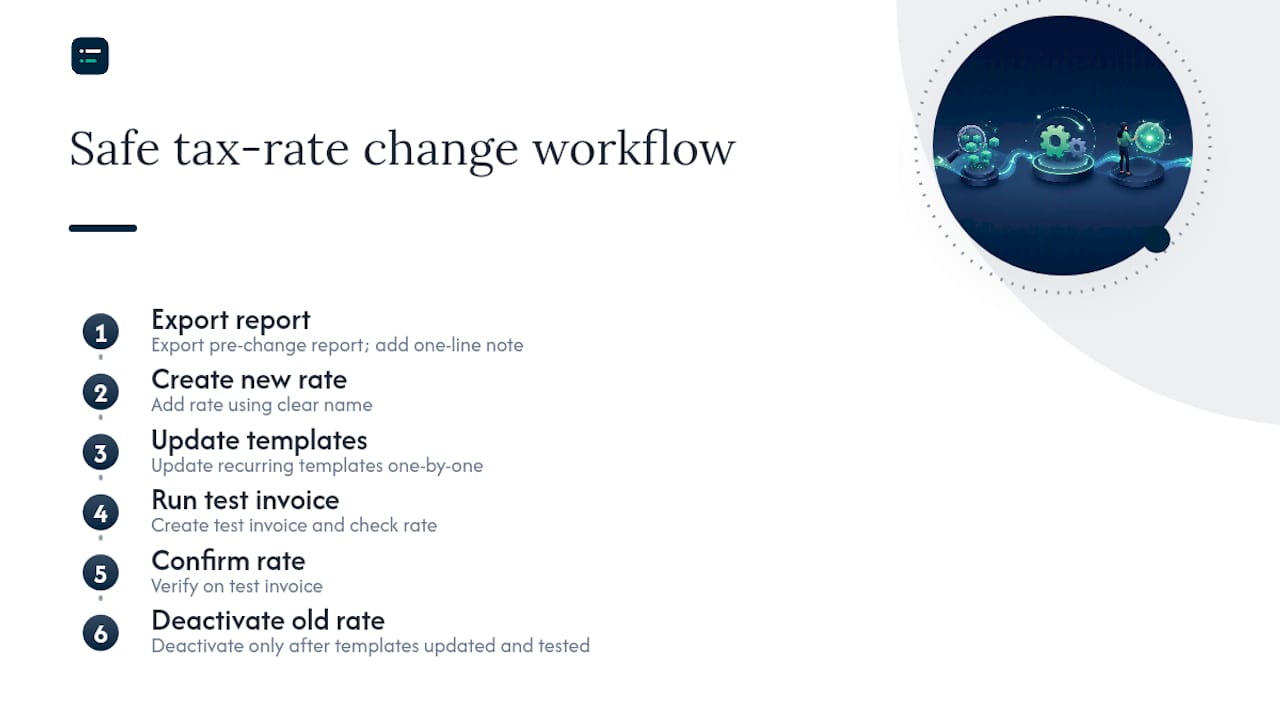
The step most often skipped is writing down why the change was made. A one-line internal note, "VAT rate updated from X% to Y% effective [date] following HMRC guidance", is quick to write and very useful if the account is ever reviewed.
A sensible order for any rate change on a busy account: export the VAT report, create the new rate, update recurring transactions one by one, run a test invoice, check the rate, then switch the old rate off. Do not switch it off until every recurring transaction is updated and the test invoice looks right.
Treat rate names like account codes: clear to someone who has never seen your setup. For practices managing multiple entities or VAT registrations, consistent naming across entities makes cross-entity reporting far less error-prone. For a wider view of the AI features built into QuickBooks, see our QuickBooks and Intuit Intelligence listing, or browse the tax prep category in our directory of 300+ tools.
- * *
!A practical editor's view on safe, repeatable tax-rate workflows, overview diagram
Sources
The following pages carry the official steps for the tasks covered in this guide. Intuit's menu labels change from time to time; all were checked on 20 November 2026.
- Edit, deactivate, or update VAT rates in QuickBooks, Intuit UK help article
- Set up and manage VAT in QuickBooks, Intuit UK help article
- Make VAT adjustments in QuickBooks, Intuit UK help article
- VAT record keeping, GOV.UK
This article is general information, not a substitute for advice from a qualified financial advisor. Consult a qualified financial professional about your own circumstances before acting on anything here.
Recommended
- Cloud accounting explained: what UK businesses need to know
- Automation tools for multi-entity accounting: 2026 UK guide
- What is real-time bookkeeping? A guide for small businesses)
- Paperless accounting practice setup: your 2026 guide)